Contour drawing is, to put it simply, outline drawing. In contour drawing we are concentrating on the outside edges of the subject(s), or the line or fold made by pattern. Shape is an important part of contour. The "weight" or strength of your line (the quality of the line) will draw your eye to it if that is what you intend.
 drawing by studiojuliakay.com drawing by studiojuliakay.com
In this image, the artist draw the outline "contours" of her hand holding whiteout, showing the basic outline and folds she saw in her hand. In our class study you will have drawn a still life using a viewfinder to create an interesting image within that sill life.
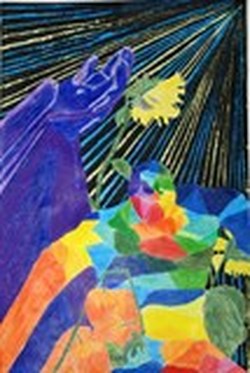
This is how your second drawing could easily look with a little careful planning and use of materials. THe background is crayon topped by tempera and scratched out for effect. Look at the 'broad areas of solid color' shown here.
Plan ahead! Have fun! Use materials to the best of their ability! |
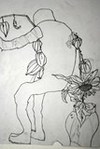 contour drawing by josie s. contour drawing by josie s.
Here you see an example of a still life in contour. You should remember to try to touch at least 2-3 sides of your paper to create your best composition.
After this drawing is completed, you will make two copies of it using the graphite transfer method explained in class. PART 2 of the contour drawing will take you into new materials and some of the principles of design, such as variety, rhythm, pattern, repetition, contrast, placement and more. From your newly created graphite transfer drawing you will use either a combination of colored pencils and crayon or crayon and tempera for broad areas of SOLID COLOR. My demonstration in class showed the three types of color I need to see in your composition. They are burnishing, layering and gradation. Here is a link to more on those topics.
|
